|
ENGINEERED
STEEL PRODUCTS |
| Priced
Full Line Products Catalog |
20
Technology Way • West Greenwich, RI 02817
Toll free:(800) 421-0314 • In RI:(401) 272-4570 • Fax:(401)
421-5679 |
|
|
|
|
Back
to Product Category
|
|
 |
|
Order
Online, by Phone, or by E-Mail |
|
|
|
~ Add
items to your online shopping cart ~
Click the Model No. of the item you wish
to purchase. |
|
|
|
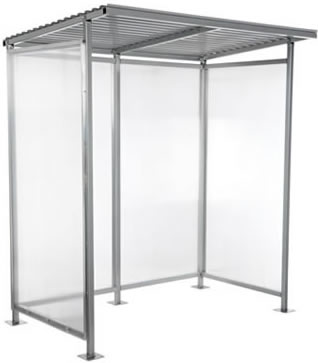
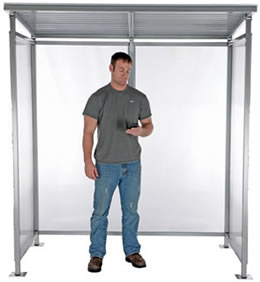
Smoking
Shelter/Bus Stop Prices |
|
|
Model
No. |
Usable
Size (W x D x H) |
Overall
Size (W x D x H) |
Net
Weight |
Price |
|
69
3/4" x 37 1/2" x 77" |
77"
x 50" x 84" |
490
lbs |
$2,587.38 |
|
1
Anchor Bolts for Concrete 3/8" x 3" |
1
lbs |
$11.23 |
|
4
Anchor Bolts for Concrete 3/8" x 3" |
4
lbs |
$21.23 |
|
|
|
|
|
Assembly
Instructions for the Smoking Shed |
|
|
|
|
|
|
|
|
|
|
 |
|
|
|
|
|
|
 |
|
|
|
|
|
|
|
|
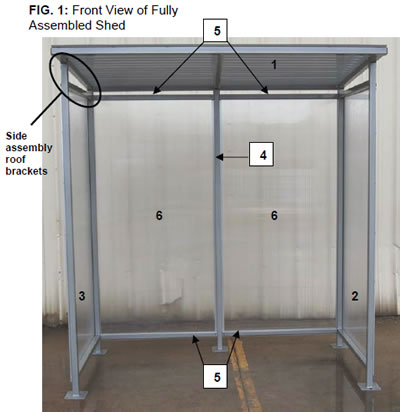
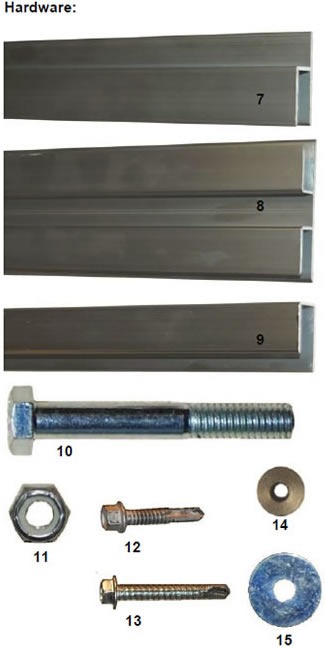
| Number |
Description |
Quantity |
| 1 |
Roof Assembly |
1 |
| 2 |
Right Side Assembly* |
1 |
| 3 |
Left Side Assembly* |
1 |
| 4 |
Vertical Support |
1 |
| 5 |
Horizontal Support |
4 |
| 6 |
Plastic Panel |
2 |
| 7 |
Single-Sided Panel Brackets |
2 |
| 8 |
Double-Sided Panel Bracket |
1 |
| 9 |
Panel Top Bracket |
2 |
| 10 |
5/16 x 2-1/4 inch Roof Fastening Bolt |
5 |
| 11 |
5/16 inch Nylock Nut |
5 |
| 12 |
#12 x 7/8 inch LG Tek Screw |
29 |
| 13 |
#12 x 1-1/4 inch LG Tek Screw |
6 |
| 14 |
Rubber-backed washer |
6 |
| 15 |
Flat Washer |
6 |
|
|
|
|
|
|
|
|
|
|
|
|
*Note: The
side assemblies are named "left" and
"right" from the perspective of a person standing
in front of the shelter. |
|
|
|
|
|
|
|
|
|
|
|
|
|
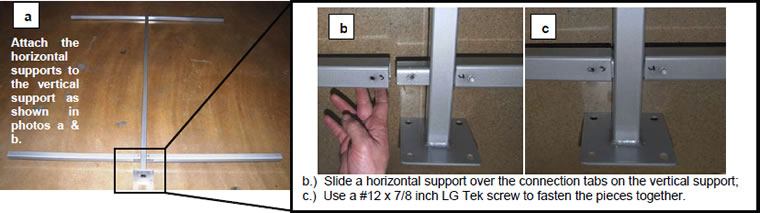
| Step
1: Assemble the supporting framework for the plastic
panels. |
|
|
 |
|
|
|
|
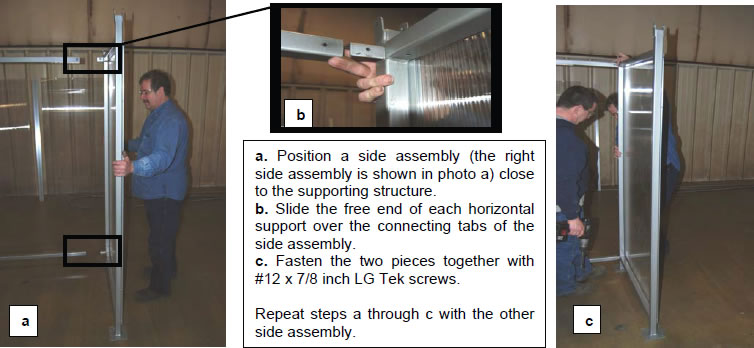
| Step
2: Attach the supporting framework to each of
the side assemblies. |
|
|
|
 |
|
|
|
|
|
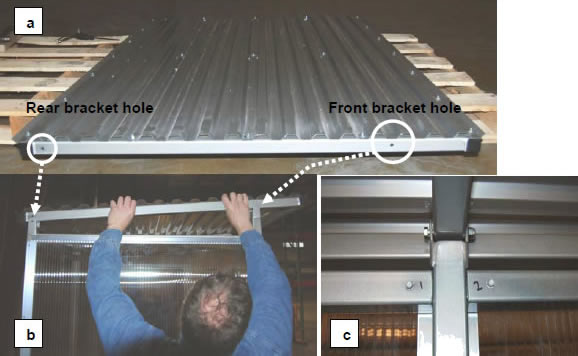
| Step
3: Attach the roof assembly. |
|
|
|
|
|
a)
Each side of the roof
assembly includes
bracket holes. Notice
that the rear bracket
hole is positioned
close to an end, while
the front bracket hole
is inset ~8-10 inches
from the front edge
of the roof.
b) Set the roof
assembly into
the roof brackets.
c) Fasten the roof
assembly to each
roof bracket with a
2-1/4 inch bolt.
Tighten a nylock nut
onto each bolt. |
 |
|
|
|
|
|
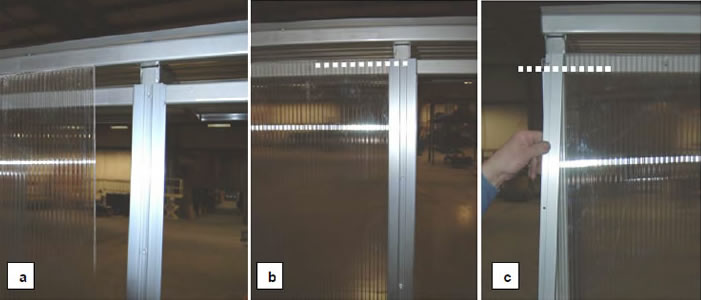
| Step
4: Attach double-sided bracket to the vertical
support. |
a)
Drill holes in the center portion of the double-sided
bracket. Drill a hole approximately 1 inch from
each
end. Drill 5 more holes evenly spaced between the
top and bottom holes. Clamp the bracket to the
vertical support so that the top of the bracket
aligns
with the dotted line shown in photo a (approx. 1-1/4
inch from the top of the horizontal support). Drill
holes in the vertical support that match the holes
you just drilled in the bracket. Start a #12 x 7/8
inch
LG Tek Screw in the top hole of the double-sided
bracket. Match the end of the screw with the top
hole in the vertical support.
b) Place a #12 x 7/8 inch LG Tek Screw in each of the remaining
holes. |
 |
|
|
|
|
Note: Installing the plastic panels may require some
looseness in the connection between the vertical
support and the double-sided bracket. |
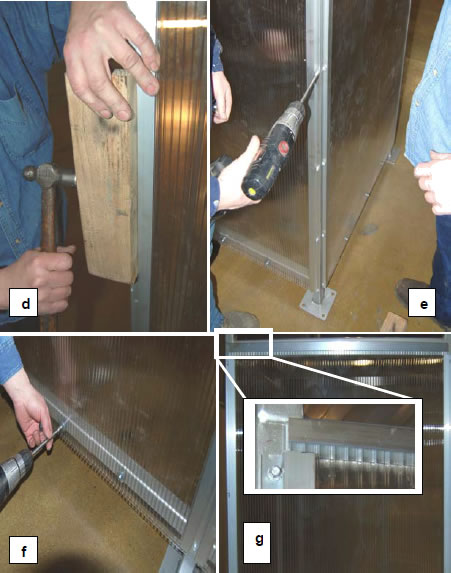
| Step
5: Install the plastic panels. |
|
|
 |
|
|
|
|
|
|
 |
|
|
a
& b) Slide a plastic panel into the right side
of the double-sided bracket. Notice that
each panel is covered by a thin sheet of
plastic. The protective covering will
indicate which side of a panel is the
exterior. Remove the plastic covering from
both sides of each panel. Insert the panel
into the bracket with the exterior side
facing outwards. Line up the top of the
panel with the dashed white line shown in
photo b.
c) Slide a single-sided panel bracket onto the
free end of the panel. Align the top of the
bracket with the bottom of the horizontal
support (dotted line).
d) Tap the single-sided panel bracket onto the
panel to ensure a secure connection. Clamp
the bracket to the side assembly. Drill a
hole at each end of the bracket and inset
them approximately 1 inch. Drill through
the bracket and into the side assembly.
e) Fasten the bracket to the side assembly
using #12 x 7/8 inch Tek screws.
f) Connect the bottom of the panel to the
horizontal support. Drill 3 evenly-spaced
holes through each of the panels and into
the horizontal support behind it. Wind a rubber-backed
washer onto a 3/4 inch #10 Tek screw, and then slide a
flat washer onto
the screw, and then fasten the panel to the
horizontal support.
g) Slide the top bracket over the top of
the panel. |
|
|
|
|
|
Step
6: Repeat Step 5 a through g with the other panel.
If you had to
loosen the screws holding the double-sided bracket to the vertical
support (Step 4), retighten the connections. |
|
|
|
|
|
Smoking Enclosure, Smoking
Enclosures, Smoking Shelter, Smoking Shelters, Bus Stop, Bus Stops, Transit
Shelter, and Transit
Shelters from your complete source for material handling equipment. |
Back
to Product Category |
 |
|